Ok, so it’s that time of year! Time to make countdown calendars for the kiddos! And instead of focusing on their calendars, I got distracted and made some other ones, and now I’m somehow behind schedule! But have no fear! This candy cane countdown calendar is here for fun and candy goodness! So, let’s get this candy cane countdown calendar started!
As an Amazon Associate, I earn from qualifying purchases. This post contains affiliate links. I may receive a commission if you purchase an item from one of my links. This will not change the price you pay.
Supplies Needed to make the Candy Cane Countdown Calendar
I have a few standard supplies that I use every year to make my countdown calendars, and this year is no different! So, here is what we need!
- One Empty cereal box or thin cardboard from cracker boxes, cardstock package or other thin cardboard packaging. I do not recommend regular cardboard, such as that from boxes that get delivered to your door.
- Cardstock – You will need card stock for 2 different parts of this project.
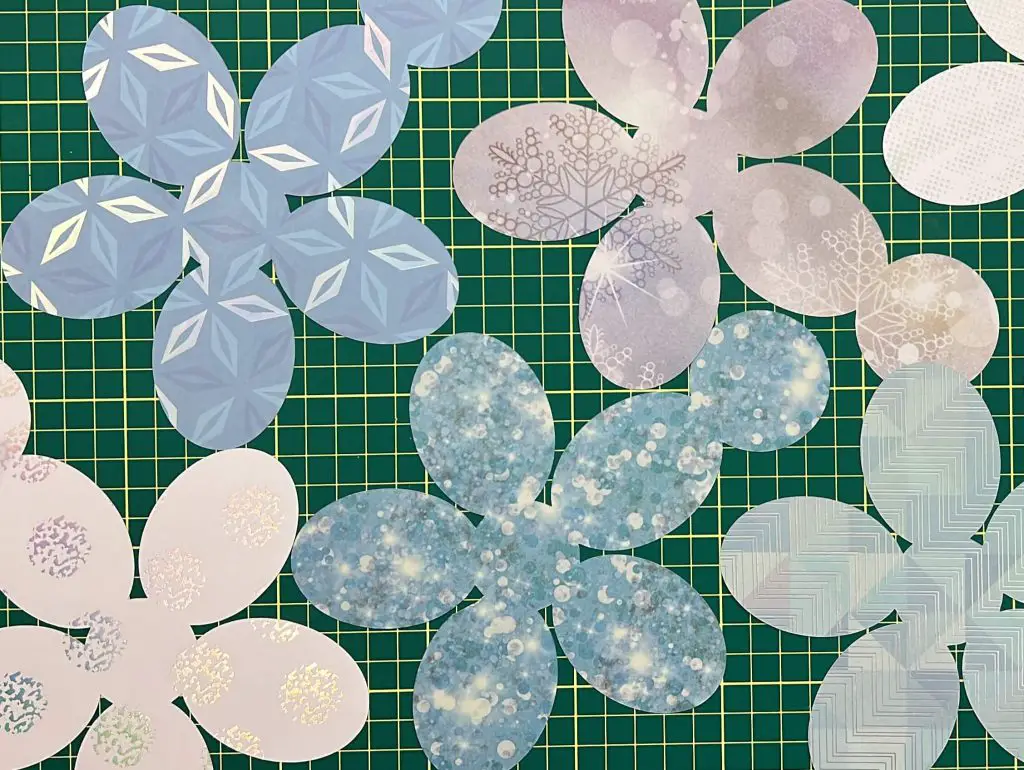
- You will need cardstock for the bulbs. I used Christmas-themed 12” x 12” cardstock. If you follow my size selection, you will need 8 sheets of 12” x 12” cardstock for this. If you want the Christmas bulbs larger you will need more, and less with smaller bulbs.
- You will also need card stock for the numbers. Ideally, this is mat paper so makers and pens will write well on it. I have 2 different number files in my free resource library that you can use.
- Ribbon – You will need two different types of ribbon:
- I use ribbon to wrap the candy cane. But you can use cardstock or wrapping paper instead. I have an abundance of 2.5” thick red ribbon, so I used this to cover the whole candy cane frame. You will need about 11 feet of ribbon.
- Ribbon to hang the candy cane with – I used 1/2″ red ribbon.
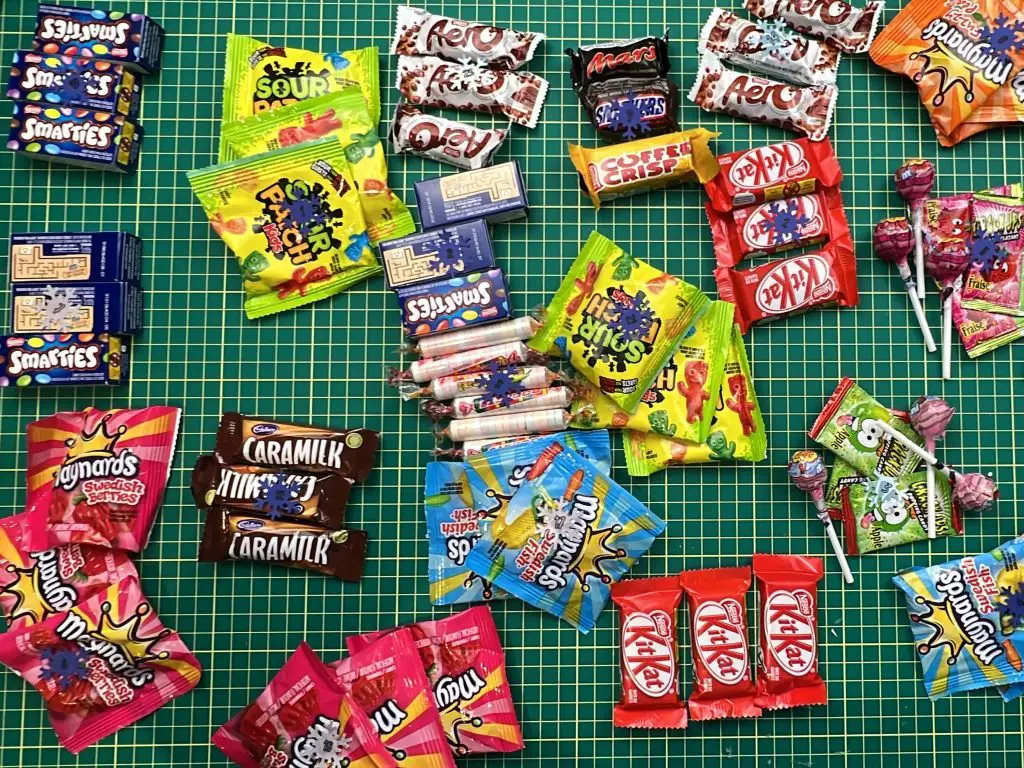
- Filling for the countdown calendar – after Halloween each year, I pull aside candies for the calendars so that I do not need to buy more.
- Glue – you need glue to close the Christmas bulbs. You can use craft glue, or you can use a glue gun with hot glue. I suggest using a glue gun with hot glue as it dries faster.
- Cutting Machine – I use my Cricut Explore Air 2, but a Maker will work, as will a Silhouette.
- Cutting Mat – like most paper projects, you will need a cutting mat.
- Markers or Pens for your Cricut – I use Cricut Markers because I have some leftovers from when I bought my machine that still work. If you do not have any, you can read this post on what other markers and pens work with your Cricut.
- Tissue Paper – Optional – matching colors to the Christmas-themed cardstock used for the bulbs
- Christmas bulb file – I have created an SVG file for this Christmas bulb. You can get it from my resource library by signing up for my newsletter.
- Countdown Numbers – I have created an SVG file for this Christmas bulb. You can get it from my resource library by signing up for my newsletter.
- Candy Cane SVG Cut File – You can get it from my resource library by signing up for my newsletter.
Now that we have all our supplies and pieces, it is time to start this project!
How to Make the Candy Cane Countdown Calendar
Select your countdown calendar treats
Every year after Halloween, I take 25 candies from each of my kids’ Halloween haul. The candy is put aside until I make the countdown calendars. This way, I have something for each day.
This also helps limit how much they get to eat in November, and I do not need to spend extra money buying things to put into the calendar.
Just some pointers – if you are making more than one calendar for your kids, for example, it is a good idea to give the same treat to each child on any given day. I like to sort my candies and place them with numbers next to them, and then I take a picture to make sure I remember what goes where.
Using the Bulb Design File
I have designed a Christmas bulb SVG file. You can download this from my resource library. You can sign up for my newsletter below and get access to it.

This file needs to be imported into Cricut Design Space or other cutting software for a Silhouette or Bother machine.
Once the file is in Design Space, adjust the design size to fit your desired bulb size. You need a size that will fit the treats you have selected. I used Halloween candies, and I made the design 6” wide. This was sufficient for Halloween candies. But I recommend you make 1 test copy to make sure.
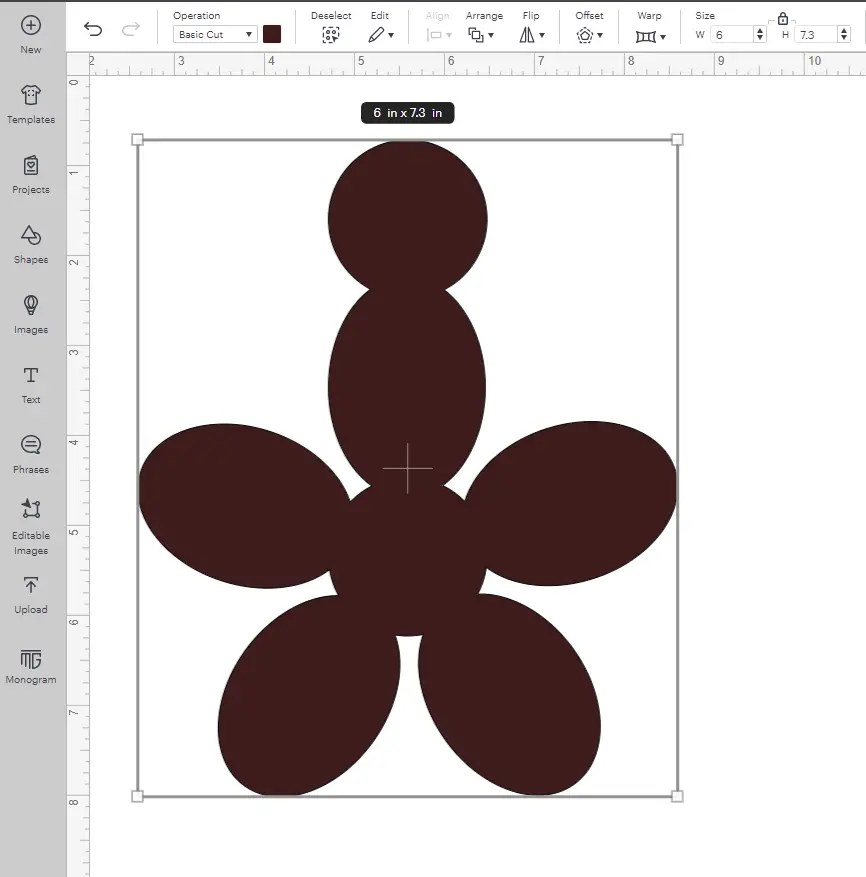
Depending on if you are counting down to the 24th or 25th will dictate if you need 23 or 24 duplicates of this design. We do our last day on the 24th, so we only need 24 pieces in total.
With a 6” wide bulb design, you can fit 3 pieces onto one 12” x 12” cardstock.
Design Space Tip: Design Space has been acting up recently, so I created a template in the canvas to help me complete the project faster. I made an 11.5” x 11.5” square. Then, I arranged 3 bulb outlines inside the square. Delete the square and Attach the 3 bulbs together. This will make 3 bulbs the same way on each paper, each time. This will save you from making adjustments on the cut preview screens. Then, increase the number of pages to 8, so that you cut 24 bulbs.

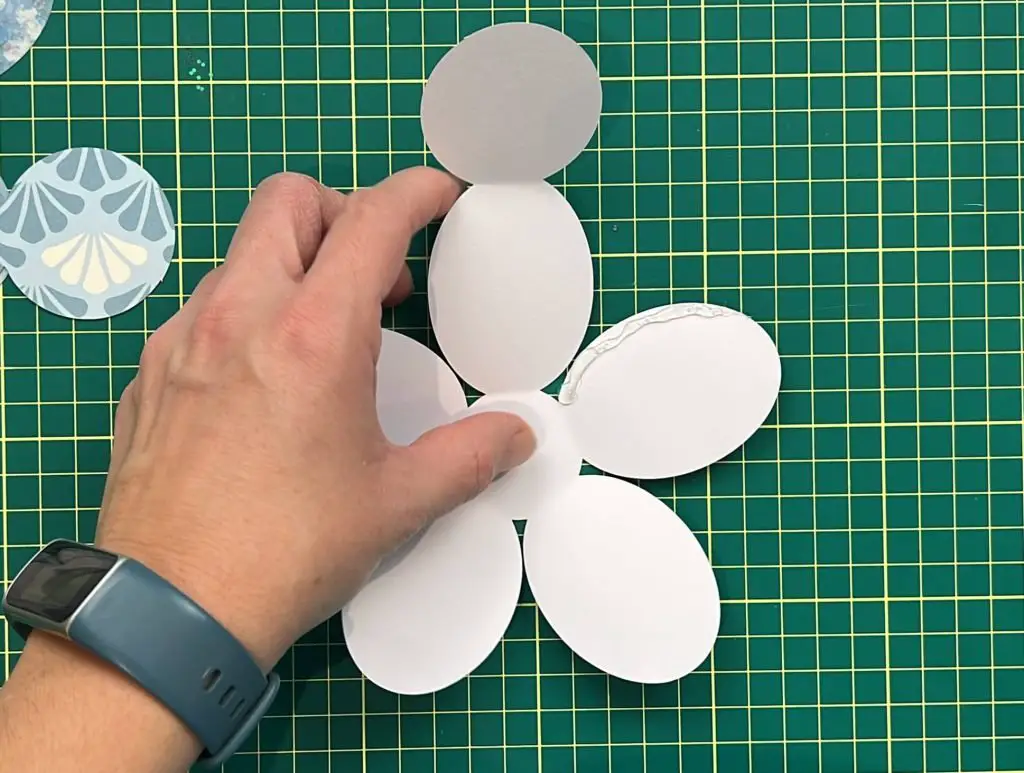
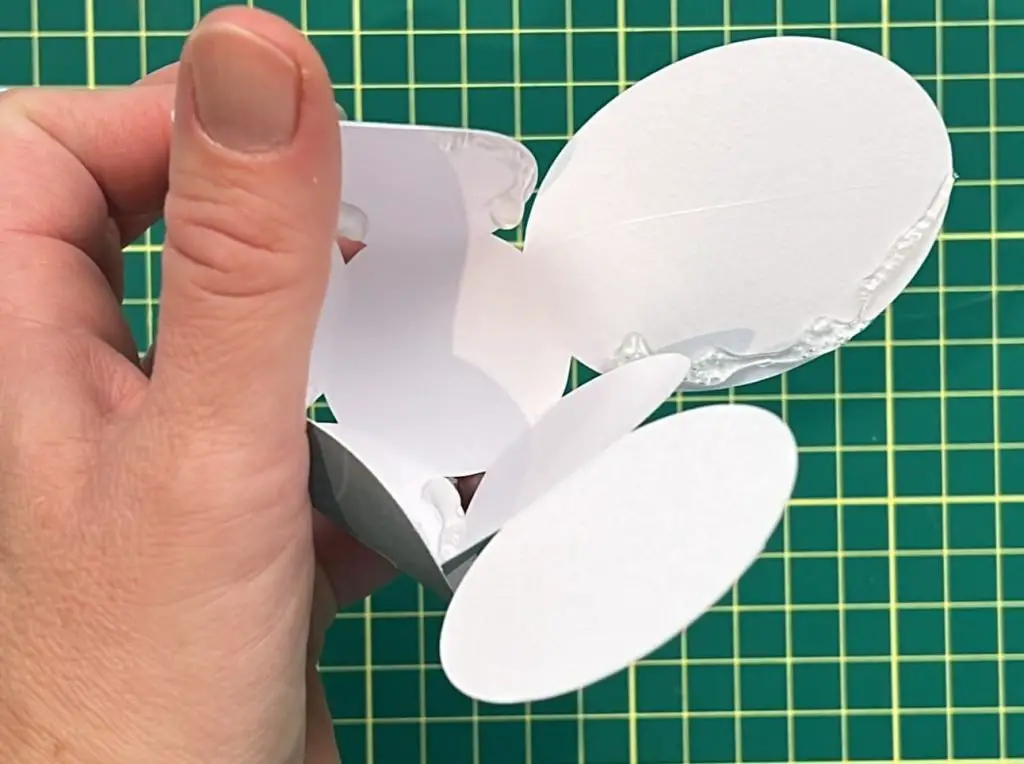
Once you have your bulbs cut out, it is time to glue them together.
I used my glue gun since it dries faster, but you can use crafting glue. If you are using crafting glue, you must hold the bulb in your hand until it is dry.
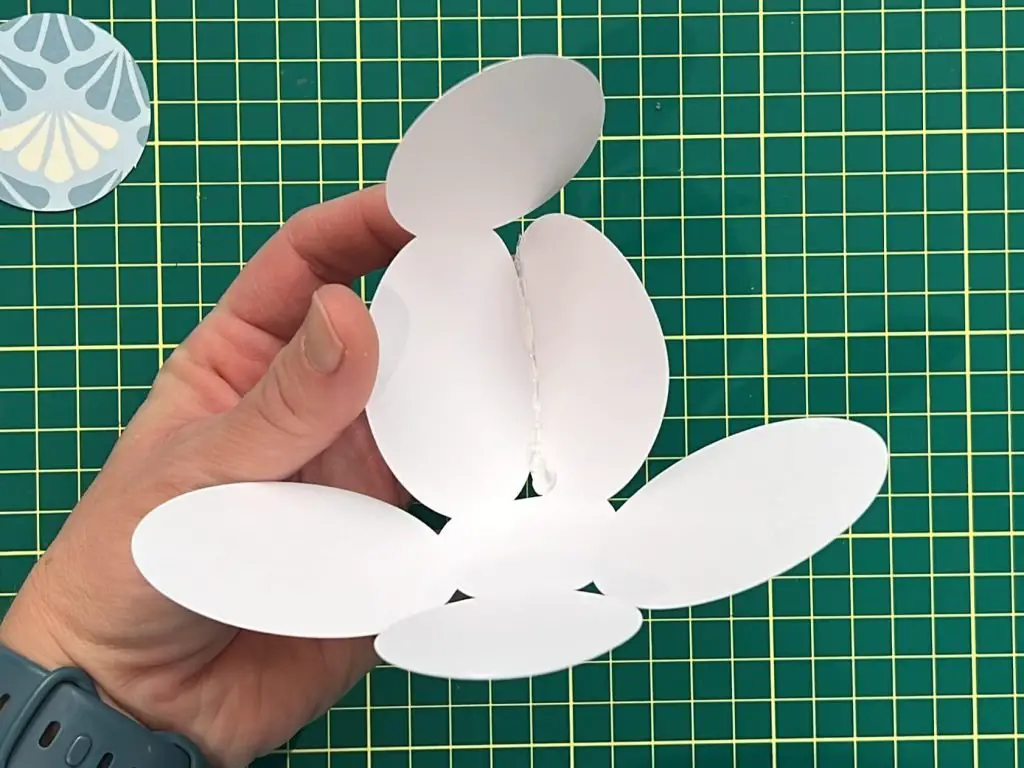
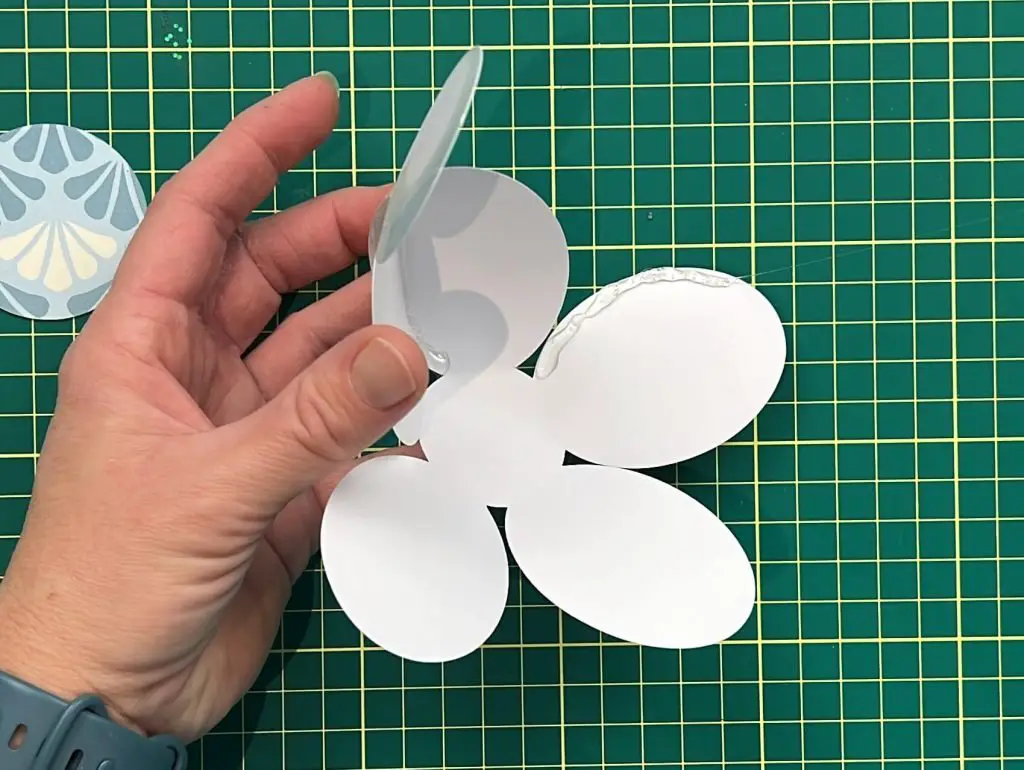
Start by drawing a bead of glue on one side of one of the circle leaves. Then, bring the up tip of the leaf next to it and place it onto the glue. Continue to glue on one side of each leaf, ideally the same side on each to give the bulb a nice symmetrical look. Once at the last leaf, apply glue to two leaves at once, the last leaf and the second side of the first leaf. Gently and carefully close the sides of the bulb by attaching them to the glue. Make sure to leave the top open.
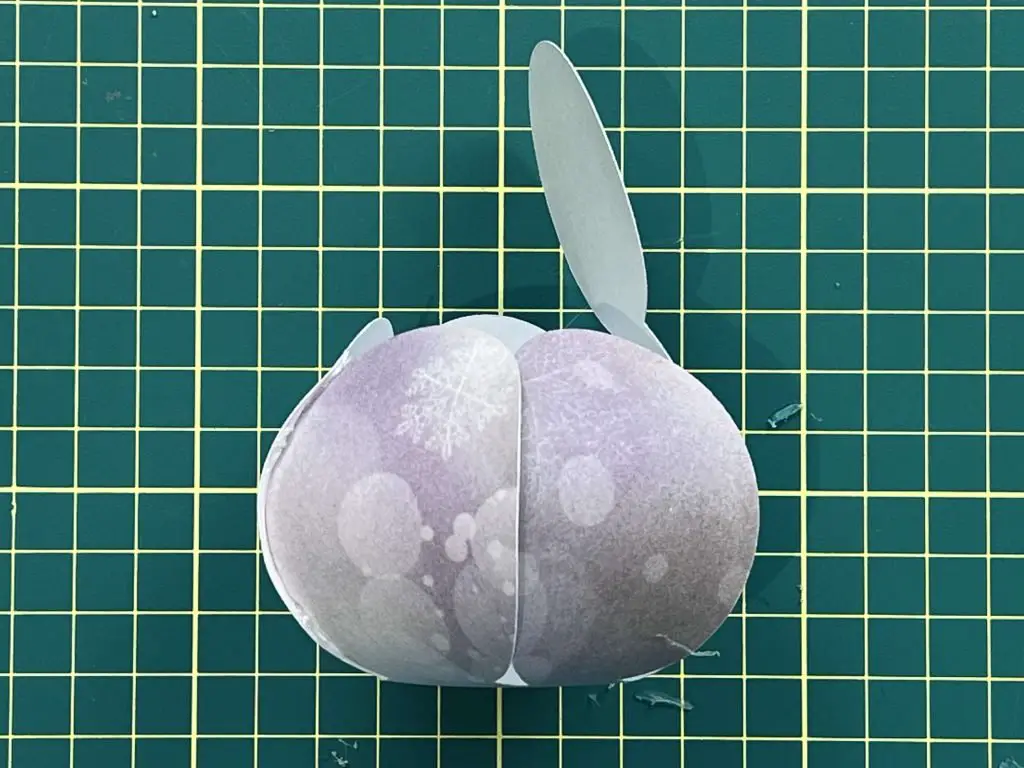
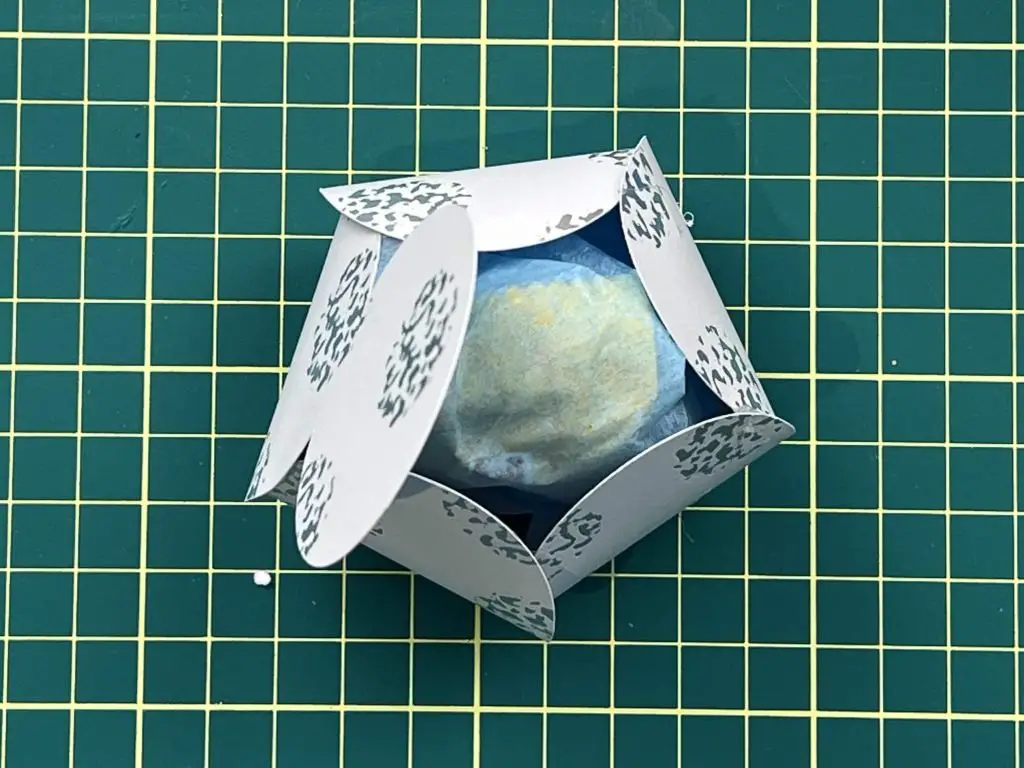
Insert your Countdown Treat into the Christmas Bulbs
The Christmas bulbs I have designed have small gaps at the top and bottom between the bulb leaves. If you have impatient, snooping children using this calendar, I recommend wrapping each treat with tissue paper. This way the insides will not be easily visible.
( If you are doing multiple calendars at a time, read the next section on numbers before you close the bulbs.)
Either wrapped or not, insert the treats into the Christmas bulb. Once happy with the placement, apply a dab of glue on top of the 4 leaves and close the bulbs.
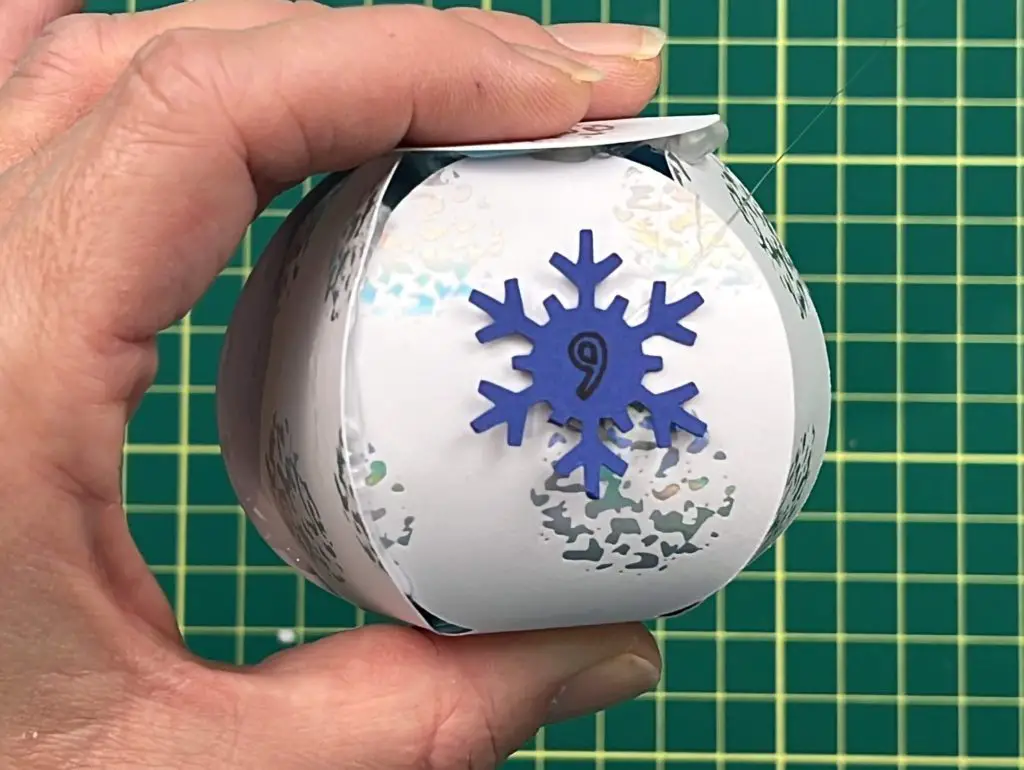
The Countdown calendar needs numbers
Each bulb in the countdown calendar needs a number. I have previously designed some numbers that can be used for this. You can sign up for my newsletter below and get access to it.
You should add the number to the bulb immediately after you put the candy inside. This is very handy when doing multiple calendars at once so that the bulbs do not get mixed up.
Making the Candy Cane Outline
For the candy cane outline, I use cardboard. Something with a bit of rigidity. I like to use empty cereal boxes (the thicker kind, not the thin ones) or even cracker boxes, or I have found myself also using the front and back cover of 12”x12” cardstock books, as I have been going through a bunch of those recently. But, basically, it is a rigid cardboard.. You do not need to use a cardboard box. Those are harder to cut and will make the project a bit more work to finish.
Using the Candy Cane SVG File
Again, I have created an SVG file for this. I am too lazy to cut cardboard with scissors, so cutting it with my Cricut is the way to go.

All you need to do is import the SVG file into your DS and adjust the file size to be 19.4″ in Width.
Then send it to Make and cut it out.
When cutting cereal boxes, I like to use the Custom Materials and Flat Cardboard settings. This will usually require me to send the mat to cut 2-3 times to cut all the way through the cardboard. Just do not remove the mat from the machine when cutting the cardboard.
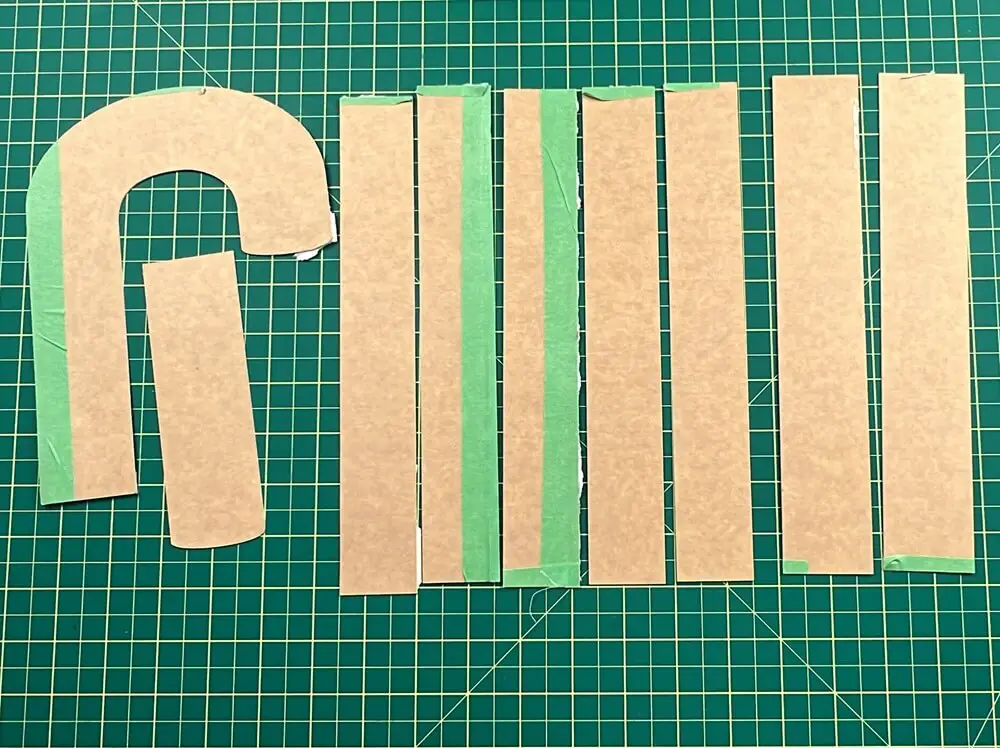
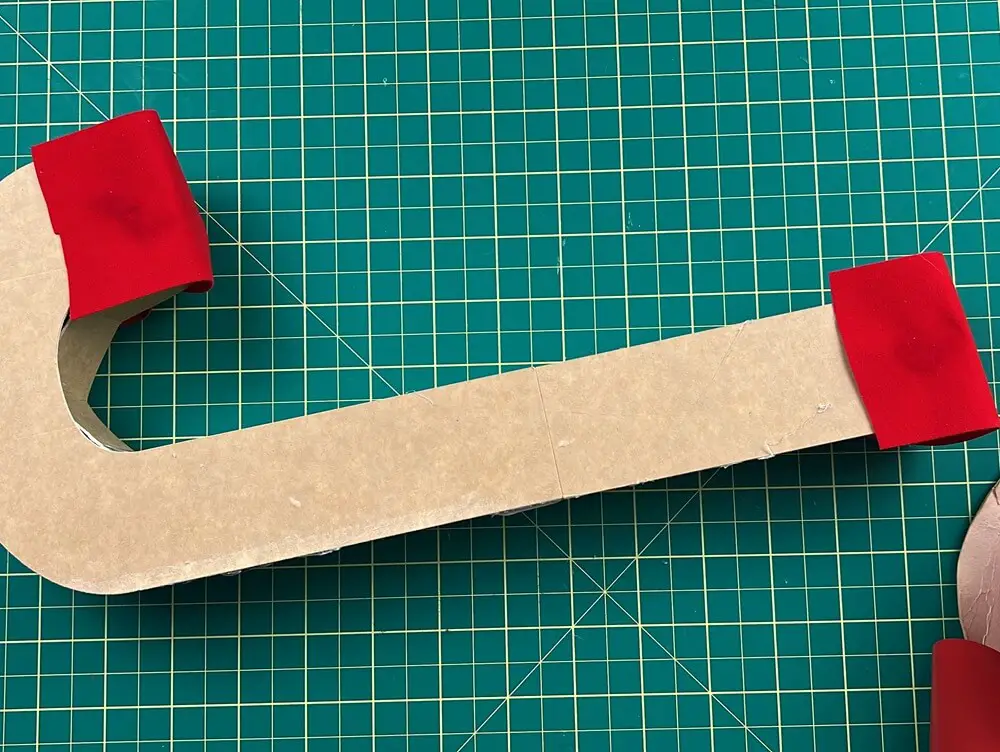
Once all of the pieces are cut out, you should have:
- 1 top of candy candy & 1 bottom of candy cane
- 5 wall pieces that are 10″ tall by 1.5″ wide
- 2 inner support walls that are 10″ tall by 1.75″ wide
Assembling the candy cane frame
The first thing that we want to do is grab the 2 candy cane pieces. I cut these in half so that you could cut them with your Cricut machine on a cereal box. I used a small leftover piece of cardboard from my cut and glued the two pieces together. This is not needed, as you can hold it together with the walls, but I did this as just in case.
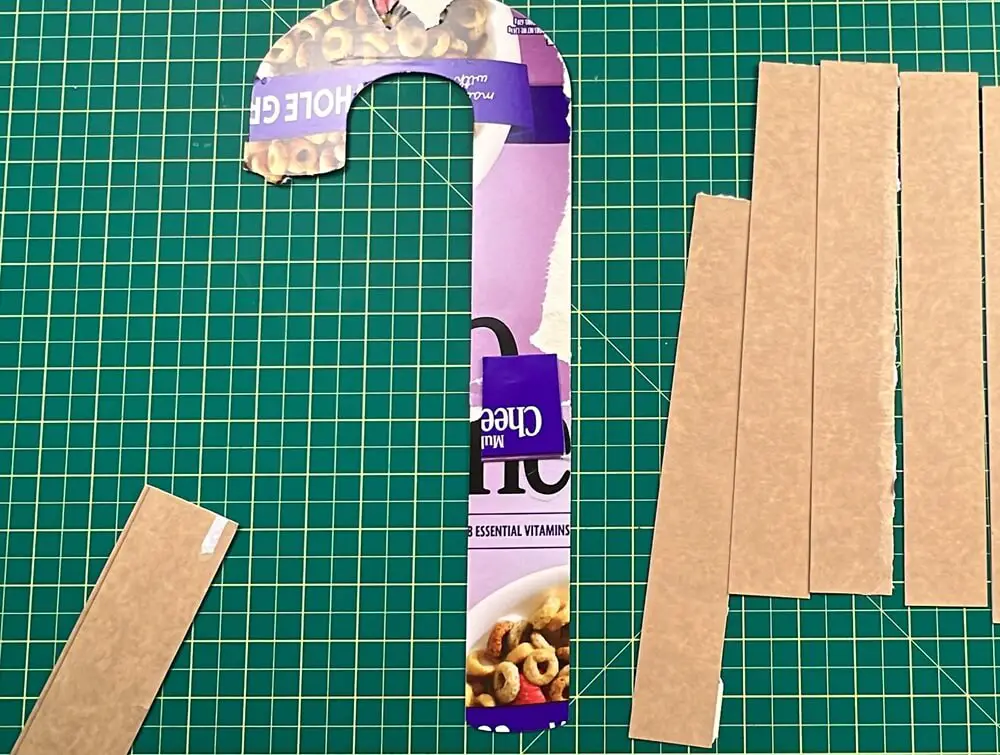
Next, using my hot glue, I glued the 1.5″ walls to the base of the candy cane. Do not mix up the 1.5″ walls with the 1.75″ walls.
You should only need to use 4 of the 5, 1.5″ wall pieces, but I have given you an extra one just in case your gluing and bending aren’t great.
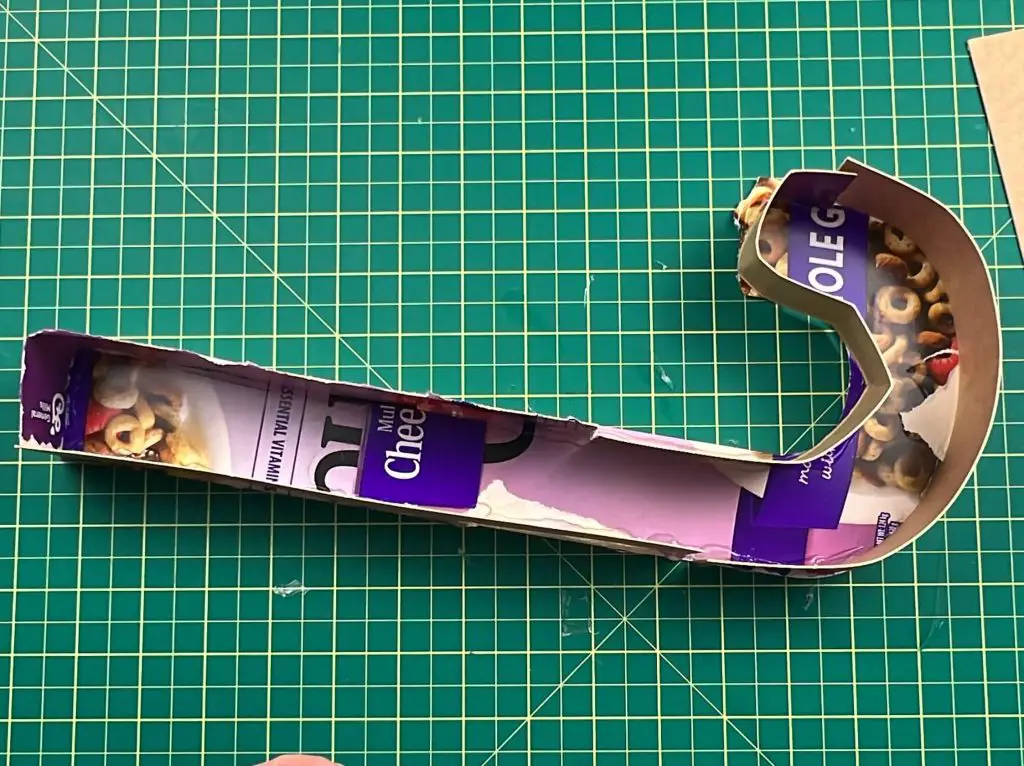
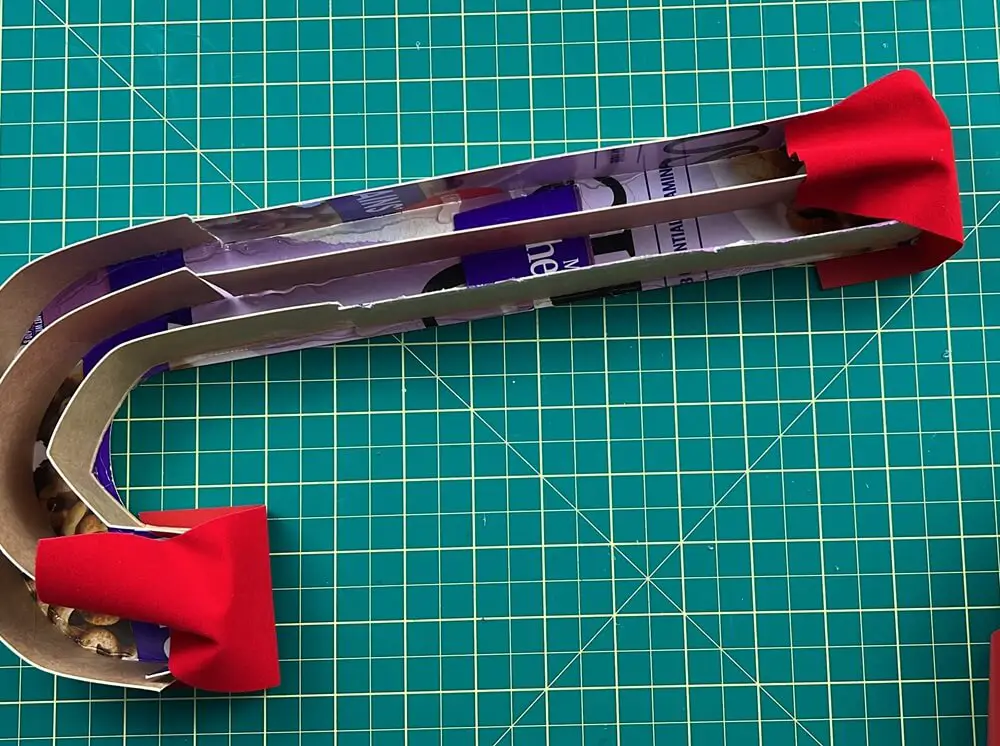
Once you have all the walls up on the outline of the candy cane, it is time to glue the 1.75″ support walls in. This secondary wall is going to be installed in the middle of the candy cane. Simply apply glue to the bottom of the wall, and place it inside the candy cane. I started at the bottom of the candy cane and worked my way up. Once I had that first one completed, I did a quick measurement for the second wall. This one requires a trim, so I quickly cut it with my scissors and glued it in the same way.
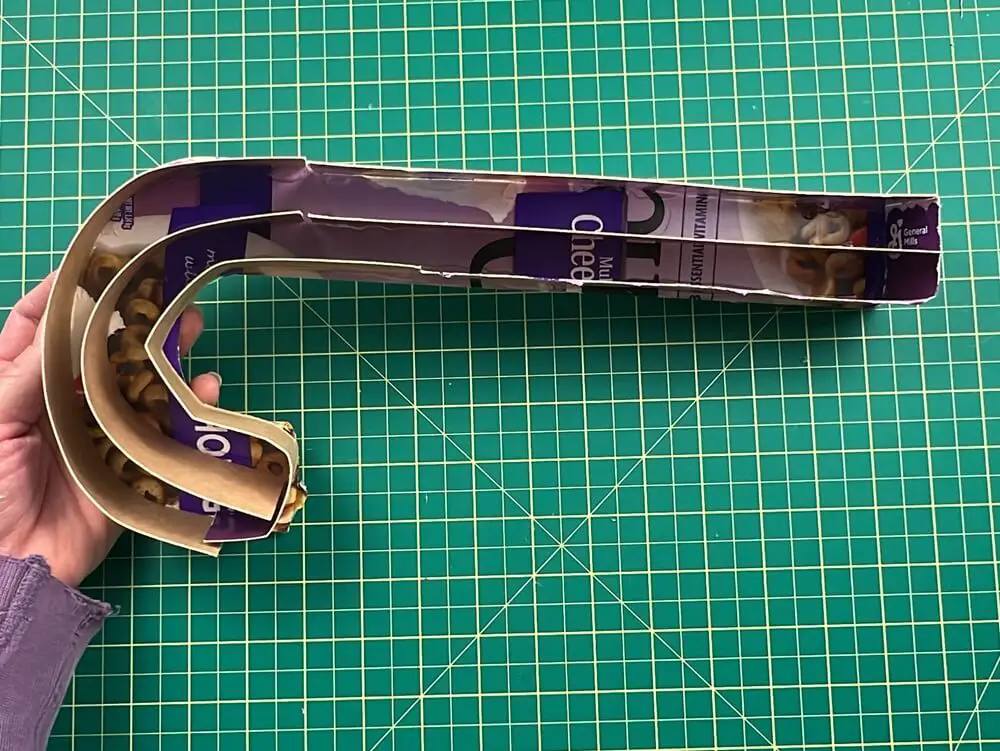
Once the glue is dry on all the walls, if you find that there are bits of cardboard sticking out from where you glued everything together, you can cut the surplus off, but this is not required as it will all be hidden.
Add ribbon to your candy cane
Ok, now for the fun part. It is time to wrap the candy cane with ribbon! I am using this 2.5″ thick felt ribbon. I have a lot of it, so this is my go-to. But if you do not have ribbon, or enough to wrap the candy cane, you can use wrapping paper instead. We are just trying to hide the cardboard of the candy cane that we made.
Before wrapping the candy cane, I cut 2 strips of ribbon, about 6″ each, and glued them over the top and bottom ends. This covers the ends and allows them to blend in with the rest of the ribbon.
Next, I start at the back, glue the ribbon onto the candy cane, and wrap the ribbon all the way up and around the candy cane. If you are short on ribbon, you can pull the ribbon to the edges when overlapping. If you are like me and have lots, you can be generous with your wrapping. Remember, the whole point is to cover up the cardboard.

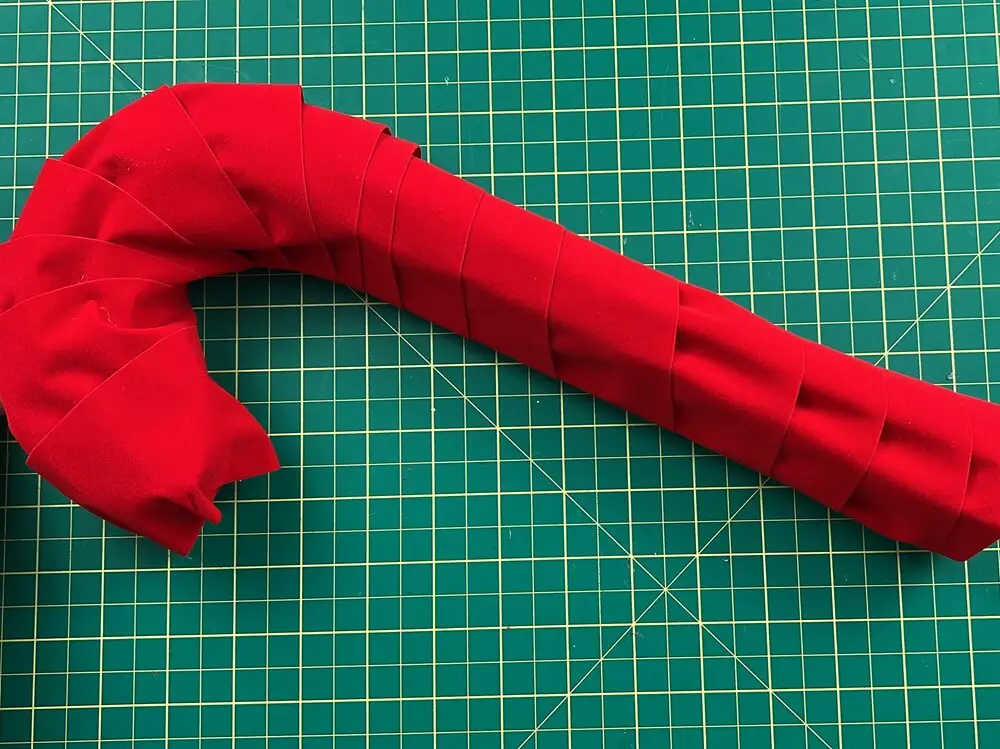
Once you are at the end, glue the ribbon onto the back of the candy cane.
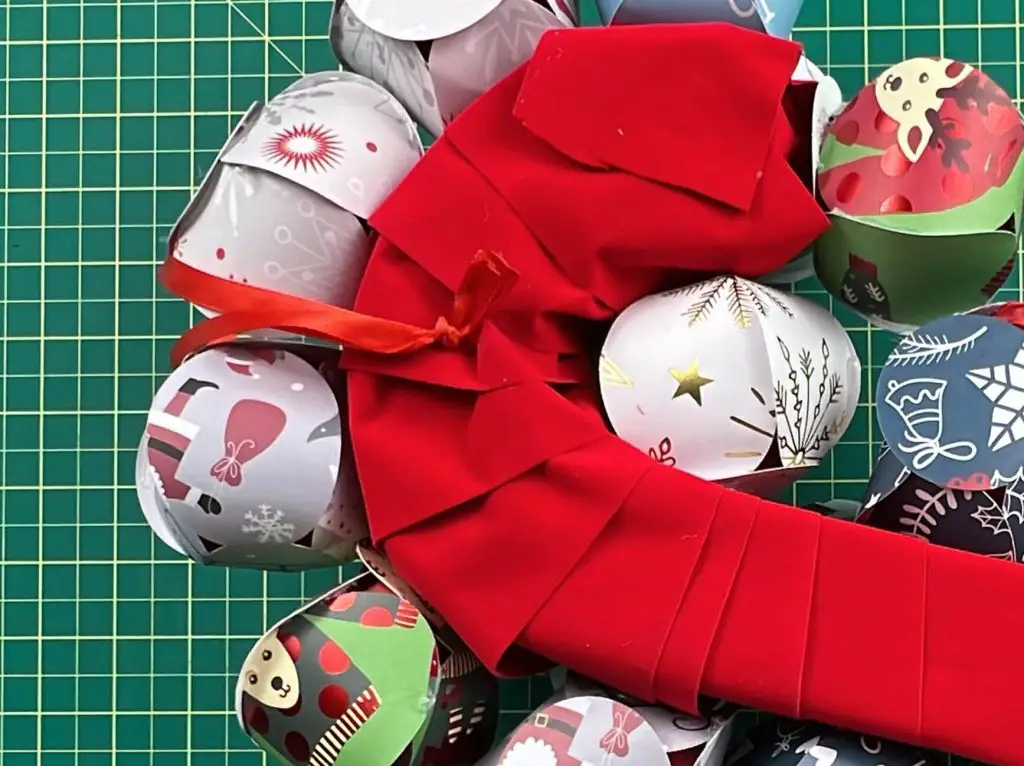
Adding the Christmas Bulbs to the Candy Cane
Ok, now for the fun part! It is time to attach the bulbs to the candy cane!
I have a few pointers before we get gluing.
- Do a quick sanity check – place the bulbs around and on top of the candy cane to make sure they all fit. I did this before I made the sizes, but if you changed any of the sizes to fit your needs, this is your last chance.
- All the numbers should be pointing outwards, so make sure you know where the numbers are.
- I recommend placing the smaller numbers (1-10) near the front of the candy cane for easy removal, and the larger numbers underneath the smaller numbers.
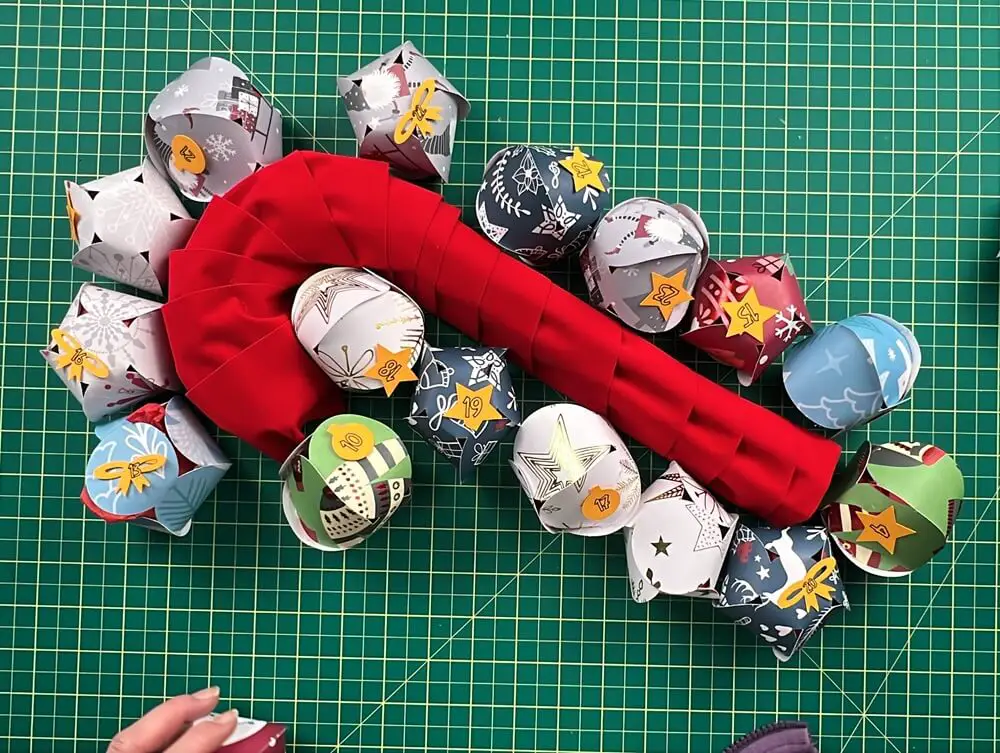
Ok, once you are happy with the fit and have your bulbs organized, it is time to start gluing them onto the ribbon! Try to space the bulbs evenly, if possible.
Add a hanging ribbon
Using your thinner ribbon, cut a piece about 6″-8″long. Make a loop and glue it to the top-back of the candy cane so you can hang this beautiful Candy Cane countdown calendar on a wall. For this, I used a 1/2″ thick red ribbon.
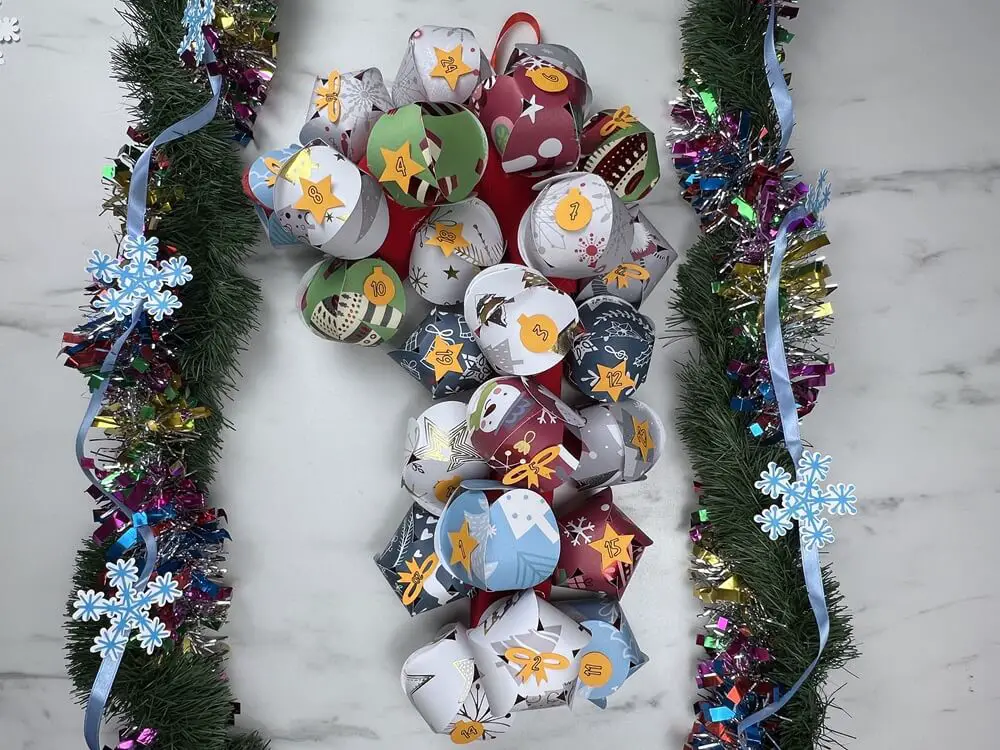
And that’s it! Your Candy Cane Countdown Calendar is Complete!
Things I learned while making the Candy Cane Countdown Calendar
As always, let’s talk about some things that we learned while making this Candy Cane Countdown Calendar:
- Candy canes are not an easy shape to work with. All the way through I was fumbling with the rounded edges of the candy cane, but this was really a problem at the end when I was gluing on the bulbs. As you can see from my final pictures, the candy cane shape is a bit lost in all the bulbs. I should have been a bit more precise with the placement and gluing of the bulbs at the top end of the candy cane to make sure they have a more rounded candy cane shape.
- I know I have used these Christmas Bulbs in previous projects, but I have to be honest with you, they are quick to make, they fit the treats, and they are very versatile, so I can use the same base for many different ideas and decorations. Sorry, but I’m going for easy this year.
- I tried to mention this while making the calendar, but it is important to do a few sanity checks on the size. I checked the sizes before I went too far into this project. But if you changed any sizes of this project, be mindful of doing size checks along the way.
- I’m really happy with how this countdown calendar turned out, even if it doesn’t totally look like a candy cane.
Did you enjoy making this Candy Cane Countdown Calendar?
Did you enjoy making this Candy Cane Countdown Calendar? Let me know in the comments below if you tried it! Also, if you made it, let me know how it turned out!
If you enjoyed this craft, be sure to check out my other Christmas crafts here.
Or, you can check out some of my other countdown calendars below:
- Holiday Wreath Countdown Calendar
- Christmas Bulb Holiday Countdown Calendar
- Hanging Star Holiday Countdown Calendar
- Toilet Paper Roll Countdown Calendar Christmas Tree
- Snowman Christmas Countdown Calendar