This year I have switched things up, and gone for a smaller Halloween costume using a cardboard box. As much fun as the large cardboard box Halloween costumes are, they are also a lot of work and make getting through doorways much harder. So, this year, we are going with a Ghostbuster theme. And that means we need a DIY proton pack to add to our Ghostbuster accessories.
The Back Story – Aicardi Syndrome And Being Wheelchair Bound
I have a friend down the street, and she has a daughter, the sweetest thing. Sadly, she has a disease called Aicardi Syndrome. Aicardi Syndrome is a rare genetic condition affecting only 4,000 people worldwide, most of whom are females. While the genetic marker has yet to be identified, it is diagnosed by a triad of symptoms, including:
- Malformation of the brain, most commonly the absence of partial development of the corpus callosum which connects the two hemispheres of the brain.
- Chorioretinal lacunae, small holes in the retina (back part of the eye).
- Seizures, typically begin as infantile spasms and progress into epilepsy that is often extremely difficult to manage.
Those living with Aicardi Syndrome typically have severe global developmental delays and intellectual disabilities. To learn more about Aicardi Syndrome, visit: http://aicardisyndromefoundation.org/
Making a DIY Proton Pack
The nice thing about this project is that you can use this concept for a wheelchair or a stroller or even turn it into a backpack.
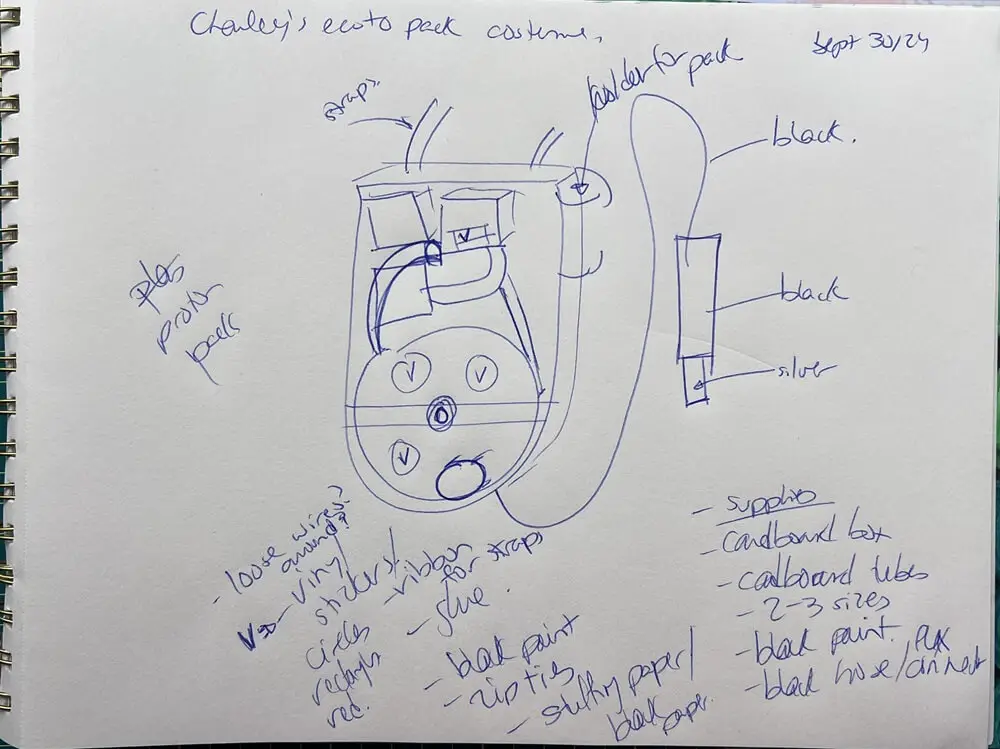
Sketching out the Proton Pack
Before I can start with any project, I need to make a sketch. So, the first thing I did was research what a proton pack looks like.
Then, with a simple pen and paper, I sketched out how I thought I could build a proton pack. Then, of course, I added some notes detailing how I would to get this all to work, including some ideas on materials and colors.
As an Amazon Associate, I earn from qualifying purchases. This post contains affiliate links. I may receive a commission if you purchase an item from one of my links. This will not change the price you pay.
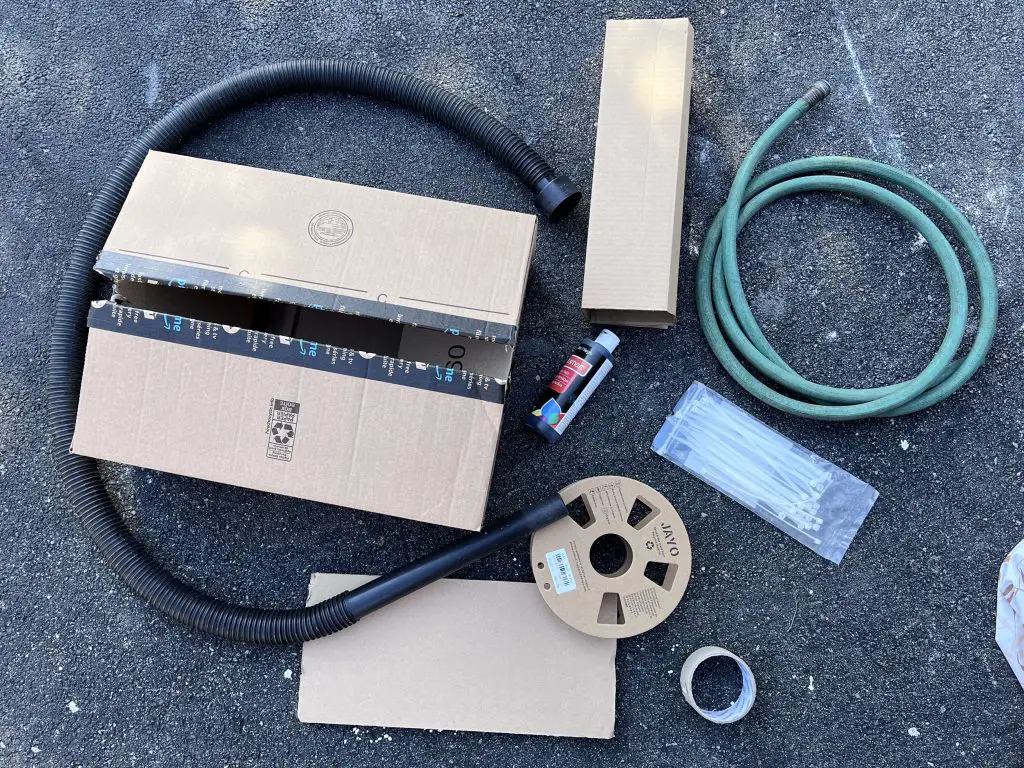
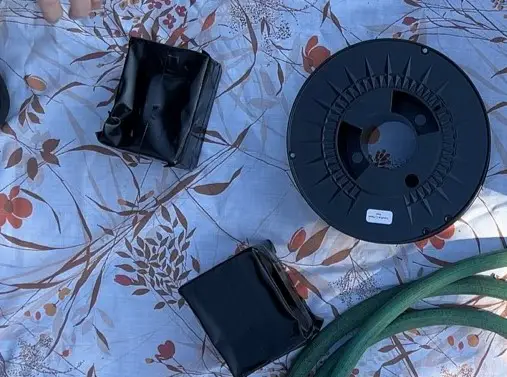
Supplies needed to make a DIY Proton Pack
This project needs a lot of odds and ends. But as this is a Halloween costume, we are pulling out all the stops.
- Cardboard boxes – you will need lots of cardboard for this project.
- You will need 1 large box. This should be the size of a backpack. The dimensions of my box are: 19″x14″x7″
- You will need 3 small cardboard boxes. I folded a cardboard sheet and cut it into 3 sections.
- Cardboard for the circle – You can use a cardboard sheet top for this, or you can use a cardboard spool or reel – I used an empty spool from my 3D printer filament.
- Old Garden Hose – about 2 to 3 feet in length. I am sure you can buy a small section of garden hose, but I recommend you look for a free one on a Facebook swap/gift page. I found mine for free on one of my Mom Facebook pages.
- Duct Tape – I found this cool black Gorilla duct tape. It makes my work easier, and I need to paint fewer items.
- Loose wires – You don’t need to use electrical cables or wires. I had a few lying around so I used them on this project.
- Paint & paintbrush– you will need black paint to cover things in black.
- Zip Ties – ideally black, but white will also work.
- Permanent Vinyl – I used scarp pieces of blue, red, gray and yellow.
- Hot Glue and Glue gun – This is my go-to for securing things together. You will need lots of glue.
- Box cutter/Utility knife
- Black bendable tube – I used the hose from my ShopVac, but black pipe insulation will work also.
- 3 sensory tubes – I used these
- A small section of old garden hose – I am sure you can buy a small section of garden hose, but I recommend you look for a free one on a Facebook swap/gift page. I found mine for free on one of my Mom Facebook pages.
- About 2 hours are required to assemble this after all the parts have been acquired.
Ok, now that we have all the bits and pieces we need, let’s start making our proton pack!
Assembling the Proton Pack
I’m going to try to keep this assembly organized, but there were a lot of things happening at once, so bear with me, if some of this seems a bit all over the place.
Cutting holes for the proton pack wand
Before we paint or do anything too serious, we want to cut a hole in the box that will be our proton pack. I like to do this before painting, but you can do it afterwards.
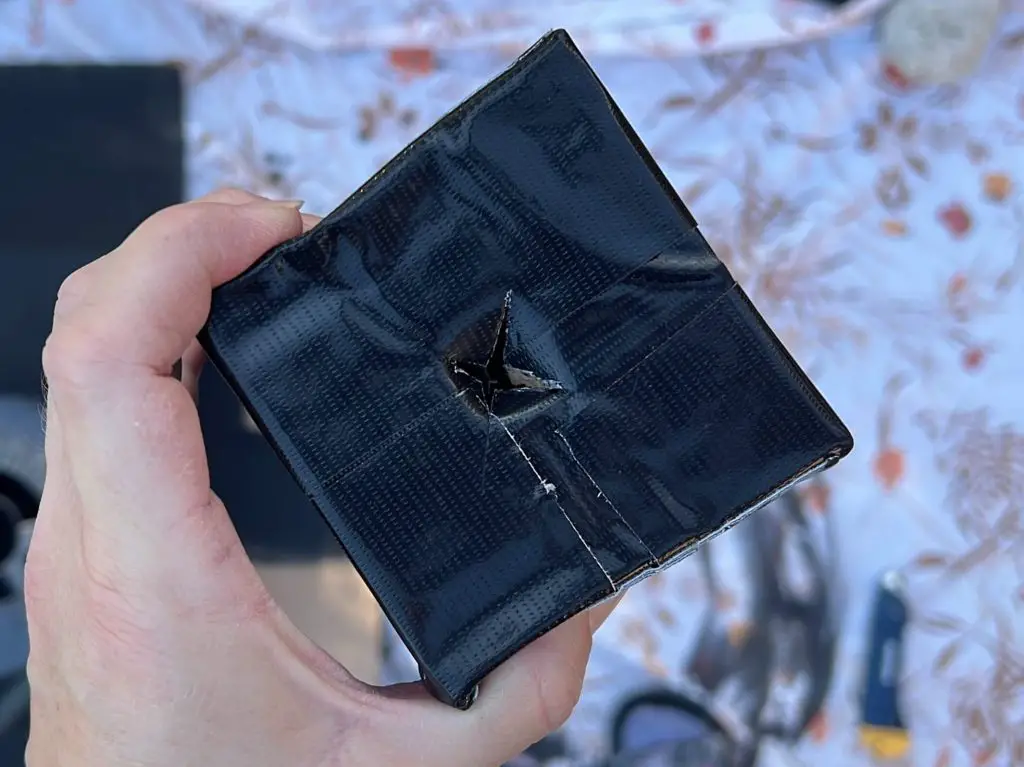
Decide where you want the proton pack wand to come out of, and using your box cutter, cut an X into the box. I did this at the bottom left corner, under the side of the box.
You want the X to be slightly smaller than the size of your hose/tube used for the wand.

Push the tabs inwards. Next, check to see if your hose end will fit. Removed the hose for now.
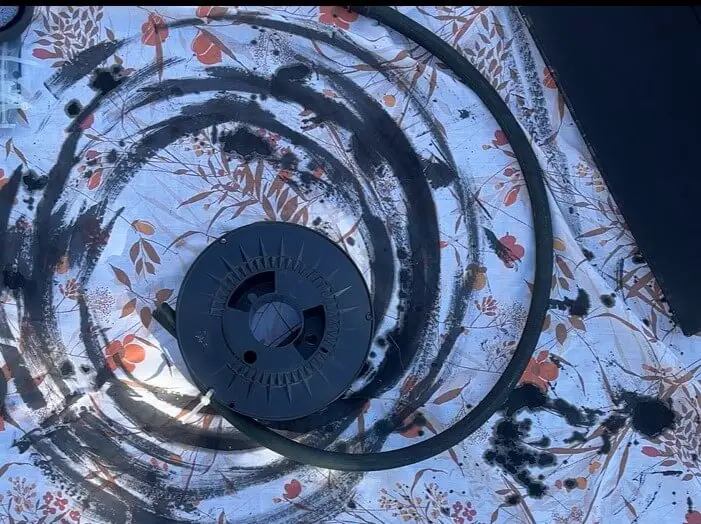
Painting the elements of the proton pack
I pulled out my trusted black acrylic paint, poured it into a cup and added water to water it down a bit. I find that this helps the paint go further. Cardboard usually needs 2 or 3 coats regardless if the paint is watered down or not. Acrylic alone would need 2 to 3 coats so watering it down saves a bit of paint.
Let’s start with the biggest piece first, our cardboard box.
Paint all sides of the box. I left the box open at this point, as I will need to insert the hose near the end of the project.
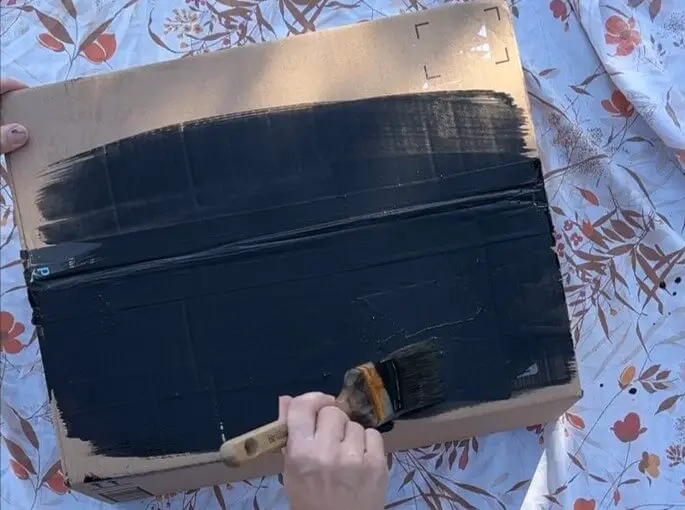
I tried to peel all the labels off the boxes to reduce the paint needed to cover everything up. In the end, I used 3 coats of paint on the box.
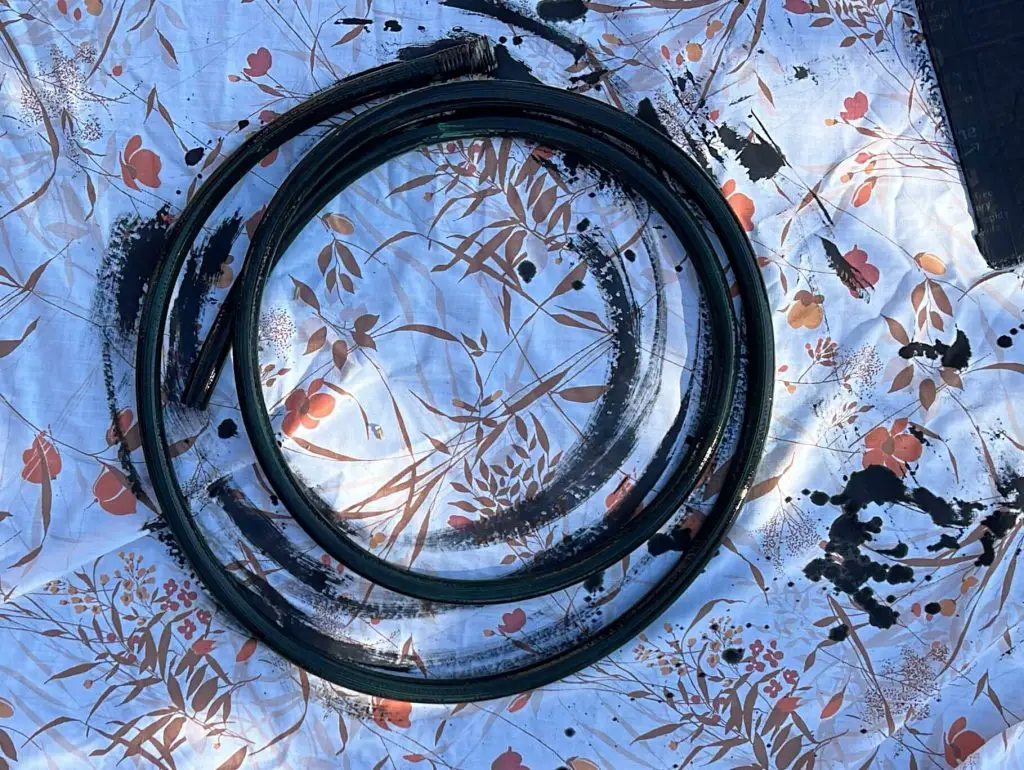
Next, you want to paint the garden hose. I did a light coat on this. This allowed some of the garden hose color to show. I found that this added a bit more depth to the design. Once the one side was dry, I flipped the hose over and repeated it on the other side.
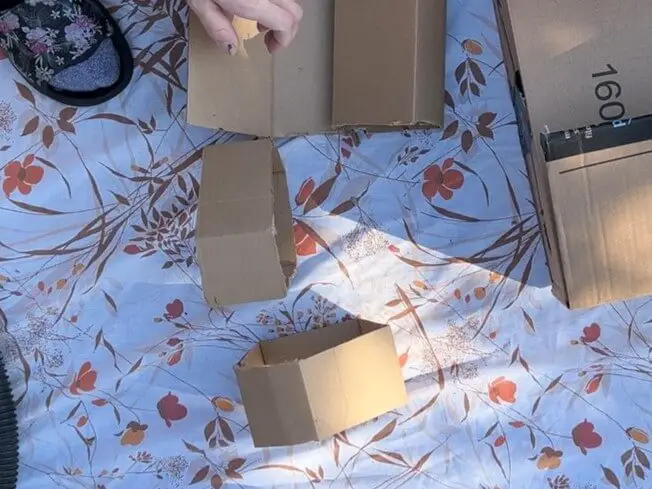
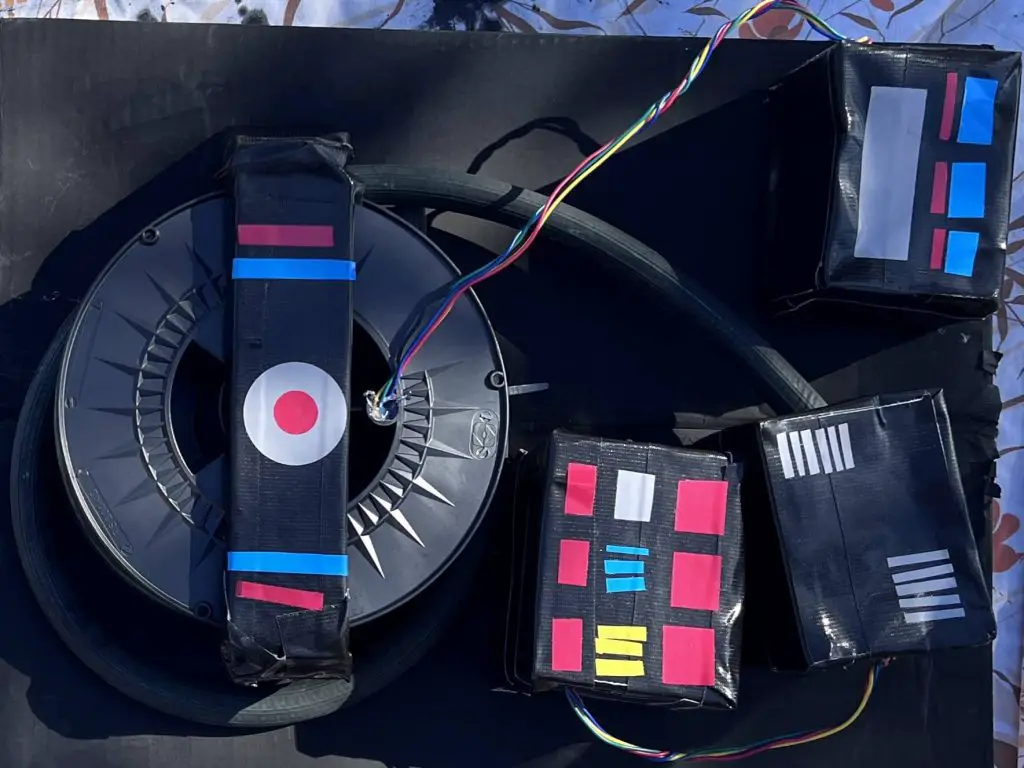
Making Proton Pack Panels
Based on my research and sketch, I needed to make 3 panels for the top of the proton pack. I didn’t have any small boxes, but I had a bunch of pre-folded cardboard that was almost the perfect size. So I cut that down to size.
I cut 3 sections. Two would fit along the top, and one underneath on the one side.
As these were made with loose cardboard, I needed to tape them into shape. I opted to tape these with black duct tape. This would force them into shape, but it would also allow them to have a different texture. I find that if I alternate materials/colors, it will make the proton pack look more authentic.
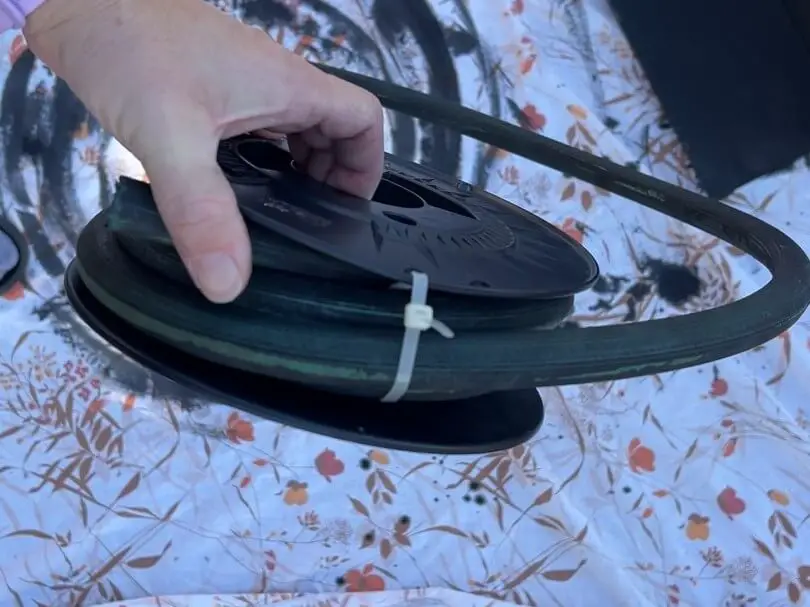
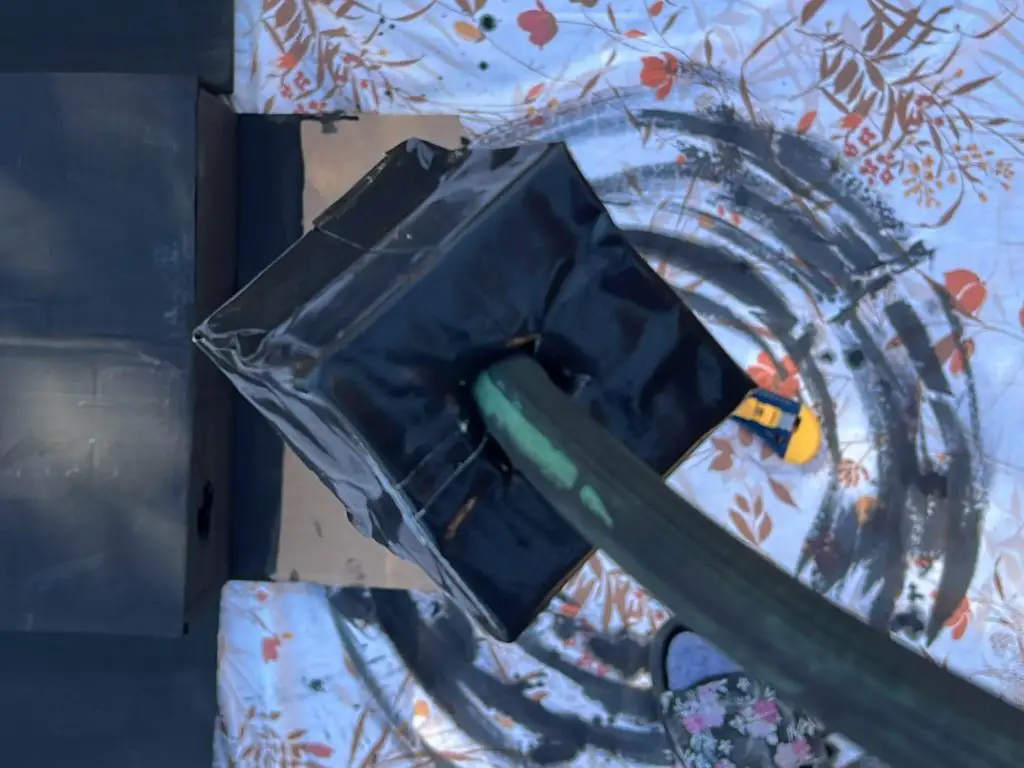
Attach the Hose to the reel
Now that my hose is dry, it is time to wrap it on the reel. Originally I planned on using a cardboard reel, but as I had black plastic ones also, I opted to use those.
If you do not have access to reels, because I understand not everyone does. You can use a cardboard tube from tissue paper or tape or even use an existing roll of duct tape or packing tape. Use some cardboard cut into a circle and paint it black. This will require more glue and extra time but it is achievable.
Ok, so I wrapped the hose around the reel a few times and then used a zip tie to hold it in place. I made sure to leave enough hose off the reel so that it could reach the top of the proton pack and go into the panels we made above.
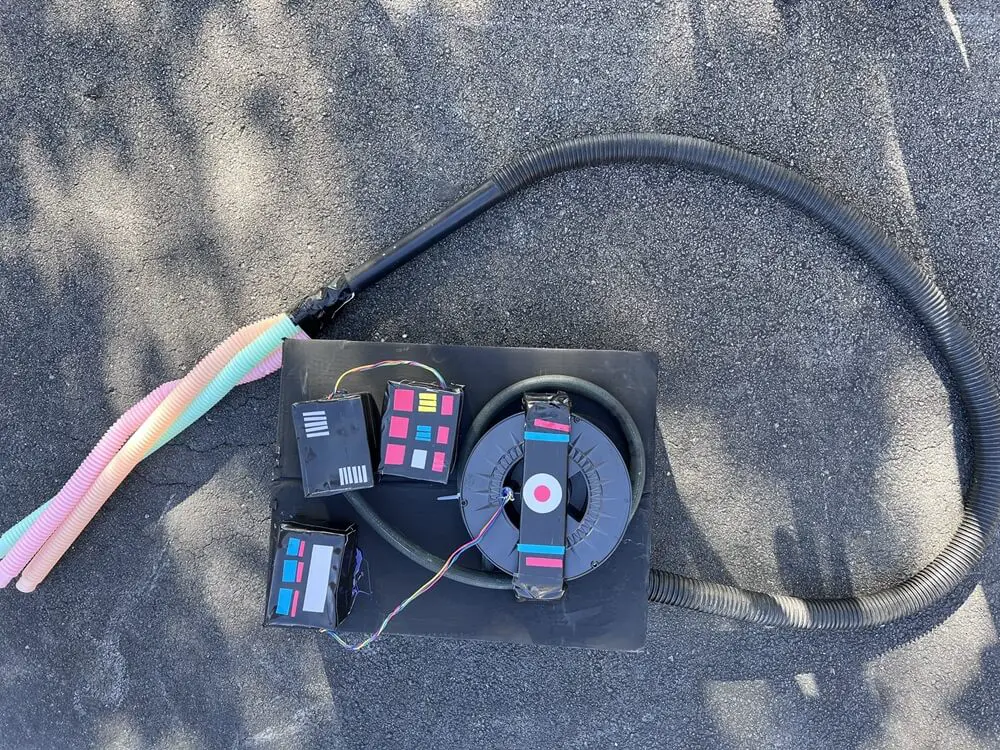
Attaching the reel and panels to the proton pack
OK, we are well on our way! First, it is time to turn on your glue gun.
While it is heating, figure out which of the 3-panel boxes you want where. Roughly place the reel at the bottom of the pack.
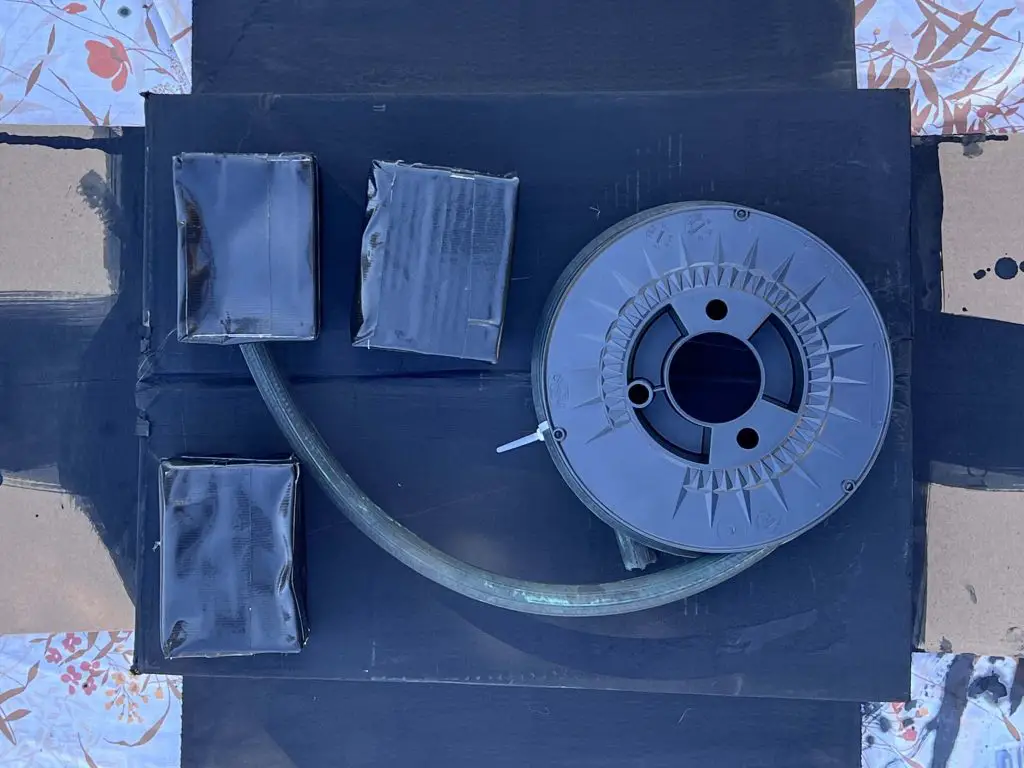
Using some eye measurements, figure out which of the panels you want the hose to go into, based on your layout. Using your box cutter, cut an X into one side of that box so that you can punch the hose through it.
When you are happy with the location of the 4 pieces (the reel with a garden hose and the 3 panels), glue these onto your proton pack.
When I was figuring out where each panel box goes, I underestimated the amount of pull the garden hose would have on the box. This caused that one box to dry askew so that one box was a bit off. But I wasn’t bothered by this.
Also, I want to point out, that I used a LOT of glue to make sure this all stuck on. A LOT OF GLUE. I probably could have zip-tied some pieces, but I wanted glue. And on the bright side, this held nicely, so it all worked out.
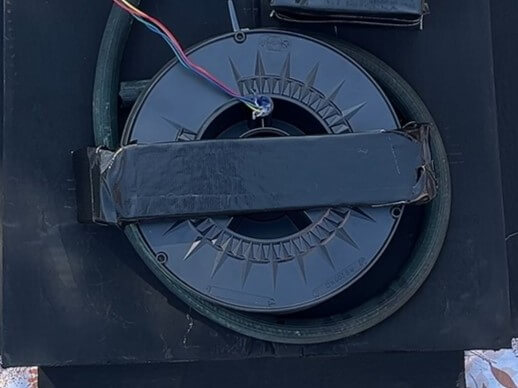
Add wires for fun
I thought it would be cool to add some wires for fun. I thought this would look cool and make it look more real.
Again, I know not everyone has surplus wires that they can use. In case that is you, here are some alternate choices:
- pipe cleaners of different colors
- rolled up paper of different colors
- filament pieces
- cut elastics
- painted zip ties
To attach my wires, I cut small holes into the boxes and pushed the wires in. The wholes were small enough that the wires were stuck in very well. The wires that go into the reel were secured with glue.

Adding a Cover on the proton reel
I wanted to add a cover or bracket over the reel to make it look more like the proton pack in the movies. For this, I cut out a strip of thick cardboard – this is often found in boxes to hold pieces apart. This piece was about 1/2 thick, but any cardboard will do.
I cut it to be about 1.5″ wide, span the top of the reel and go down to the proton pack on both sides.
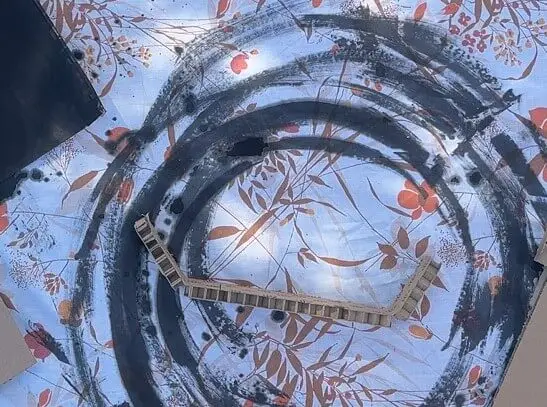
Once happy with the length, I cut notches into the cardboard so that it would fold easily. Again, using my black duct tape, I taped all around this cardboard to make it black so that it would keep its shape.
I then did a test fitting to make sure it all fit snuggly. When I was happy with the fit, I glued this strap over the reel.
Attaching the proton pack wand
At the beginning of the project, we cut a hole into our main box. Now we are going to use it.
I used my ShopVac hose. It has 2 pieces. One piece is the hose, and the other piece is an attachment point that connects the hose to the vacuum. I pulled these 2 pieces apart and put the attachment piece through the hole. Then I secured the hose on the attachment piece. This will keep the hose in place.
But if you are like me, and want a bit more security so that the hose won’t pop out, you can apply some duct tape on the inside of the box, holding the vacuum attachment in place.

Once this hose is secured, you can tape the box shut. I again used black duct tape for this.
If you don’t have a black vacuum hose available, black foam insulation used for hot water pipes will also work.
Adding lasers to the proton pack wand
Finally, we need something that looks like the weird proton lasers that come out of the proton pack. I found 3 of these sensory pop tubes in similar colors to what is in the movies, and using duct tape, I taped them onto the other end of the hose.
I think these look great, my only small issue is they flop when attached to the chair. But I’m ok with that for now.

Adding accents to the proton pack
Once I had all the pieces in place it was time to add some color. I cut out squares and rectangles with permanent vinyl, I used red, blue, yellow and gray. I applied them in locations to make them look like buttons or flashing lights.
If you don’t have permanent vinyl, using colored tape, such as electrical tapes, or other colored duct tape will also work.
Add as many or as few accents as you wish.
Attaching the proton pack to your Costume
This proton pack is attached to a wheelchair. So I punched 4 holes in the proton pack, 2 on top, and 2 down below, so that the proton pack could easily be zip-tied to the wheelchair. I also used black zip-ties to attach the wand to the side of the wheelchair to make it look like the proton pack was being used.
A similar method could be used for a stroller.
If you want to use this as a backpack, you can glue on ribbon or webbing and make straps to wear the backpack.
And that’s it! The DIY Proton Pack is complete!
Some comments about making a DIY proton pack
As with all projects, I am never 100% happy with the final outcome of this DIY Proton Pack. But that is me, and I’m sure many other crafters. But that’s ok. No one other than me sees the issues. But, I did learn some things while making this costume accessory:
- There is no such thing as a proton pack, so if you are making one, don’t worry if it’s not exactly as per the pictures! Anyone who is a Ghostbusters fan will know what it is!
- When working with wheelchairs, the costume must fit through doors. This year I opted to make a smaller costume just for this reason.
- There are lots of workarounds when trying to make this project. Every piece I made or used, could have been made with something else, so if you don’t have something I mentioned, there are other options!
- My original plan was to use a cardboard reel from my 3D printer filaments and paint it black. But I was feeling lazy and thought using a black one would look better and result in less work. And I really like the end look of this.
- I used a lot of glue to hold the panels and the reel on the cardboard box. Everything is holding, and we even went on a Halloween walk with it, and all the pieces stayed in place. But I had to use a LOT of glue. More than I normally would, but I was happy with the end result.
- Just have fun!
If you enjoyed this Halloween Post, be sure to check out my other Halloween Posts Here.
If you are specifically looking for Halloween costumes for wheelchairs, check out these posts below:
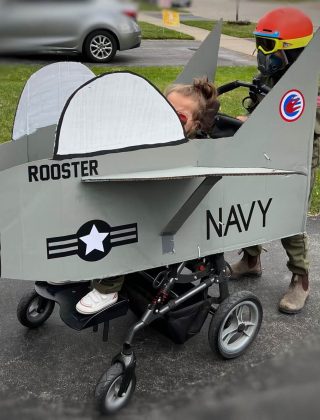
- Princess Peach Wheelchair Halloween Costume
- Fighter Jet Wheelchair Costume
- Fighter Jet Wheelchair Costume
Did you enjoy this post on making a DIY Proton Pack?
Did you enjoy this post on making a DIY Proton Pack? Let me know in the comments below. Let me know if you tried making one of your own!