I’m not sure what is going on, but I have decided I need more bookmarks! I’m not reading that many books at once, but I like to add a piece of art to my reading, so I have ventured into the world of holographic bookmarks!
So, let’s get right to it!
As an Amazon Associate, I earn from qualifying purchases. This post contains affiliate links. I may receive a commission if you purchase an item from one of my links. This will not change the price you pay.
Supplies needed to make holographic bookmarks
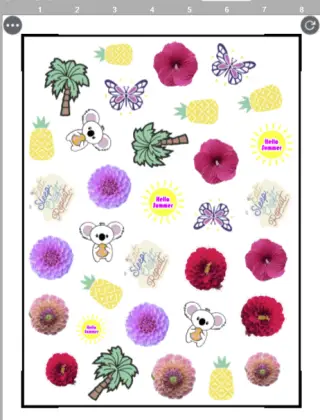
- Bookmark Design – If you want to make bookmarks, you need a design. Fortunately, I have created a set of 12 bookmarks. You can get this file below by signing up for my newsletter. But don’t worry I also walk you through how to design your own for FREE, so keep reading.
- Paper – The bookmark designs will be printed. I used white printer paper but 60 lbs cardstock also works. Using cardstock makes the bookmarks more sturdy, but printer paper works fine.
- Holographic sticker sheets – We are making holographic bookmarks, so we need holographic sticker sheets. I used this set of holographic sticker sheets, it comes with 4 different holographic patterns.
- Printer – You will need to print the bookmark designs on a printer. I used my Epson ET-2850.
- Corner Cutter – optional
- Cold Laminator – optional
- Scissors or paper cutter
- 10 minutes or less to put this together.
Ok, now that we have all our supplies, let’s get this project started!
Making holographic bookmarks
As with all my projects, this project needs a design. I created several bookmark designs in Canva.
I will walk you through how to design your own, but if you do not have time to make a design, don’t worry, I have you covered. You can get my designs below by signing up for my newsletter.

How to design a bookmark for FREE
Let’s learn how to design a bookmark for Free.
I think the best way to get started with this is by jumping over to Canva.com.
You will want to start a new project. I suggest selecting the Custom Size on the top menu of the screen. This will open a window for you, allowing you to choose the size of the project that you want.

You will want to start a new project. I suggest selecting the Custom Size on the top menu of the screen. This will open a window for you, allowing you to choose the size of the project that you want. As I will be printing this on regular 8.5″ x 11″ paper, I will fill in the size to that, and make sure to adjust the units to Inches. I suggest changing the units first. Otherwise, you will need to re-enter your size into the width and height boxes.

This will open up a screen for you with a blank page.
From here, you will want to select the Elements button on the left side of your screen.

This will open a search menu for you. At the top, type in what you are searching for. In my case, I am looking for flowers. So, I typed in Pink Flower, and a list of flowers popped up. Select the See All text next to the Graphics header to expand this category, this will show more options.

Now you will be able to browse and choose any image you like. Keep in mind that any image with a little crown on it is a premium item and is part of the membership program/needs to be paid for. As I like free, I will look for items without a crown.
Several items fit the bill. Click what you like and it will pop up on your worksheet. You can modify the size by clicking and dragging the edges in.

I like my bookmarks to be about 1.5-2″ wide by about 6″ long, so I adjust the sizes to roughly fit within that area. Keep in mind I don’t have a measurement tool in Canva, at least not that I know of. I am simply eye-balling it and making the design the size I think that would fit on the 8.5″ x 11″ paper.

Repeat this process until you have enough designs to fill one sheet of paper. Using the dimensions I suggested above, you should fit 4 to 5 bookmarks per page.
Once satisfied that you have enough bookmarks, Click the Share button located at the top right of your screen and save the design to your computer so that you can print it.
Tips on Printing your Bookmarks
A tip for when you are printing your bookmarks. The quality of the paper will greatly impact the final quality of your bookmark.
If you are using regular printer paper, your bookmark may be less vibrant and not be very thick. There is no problem with this, this is how I make mine.
If you use thicker paper, such as 60lbs cardstock, your bookmark will be thicker and depending on the quality of the cardstock your color may be more vibrant.
I like to use regular printer paper for this craft.
Making your Bookmarks Holographic
Once your bookmark design is printed off, it is time to make it holographic. Do not cut the bookmarks out first.
When working with holographic sticker paper, I like to peel off about 3/4″-1″ of the backing paper and fold it over. I then place the holographic sticker paper over the design. When doing this, I make sure to keep the 3/4″ uncovered area above the design and not pressed down. I align the rest of the paper with the full design of the bookmarks. When happy with the placement, I adhere the top uncovered part of the holographic paper to the printed paper.

Once the little section of the holographic paper is adhered to, I slowly pull away the remainder of the backing paper while sticking the holographic paper to the printed bookmarks. When doing this, you can use your hands, a ruler or a burnishing tool to remove air bubbles and ensure a smooth placement.


Now that you have holographic paper on the front, repeat the same process on the back. I like to have both sides of the bookmark holographic. The nice thing about adding holographic paper to the back is it will increase the thickness of the bookmark and make it more durable.
If you have a cold laminator, you can run the holographic-covered bookmarks through it to give a good press. Please note that you do not need to do this. I don’t have a cold laminator and mine sticks just fine.

Cutting the Bookmarks
Now that the bookmarks are covered with holographic sticker paper, it is time to cut them to size!
I like to use my paper cutter to cut them up, but if you do not have one, scissors will work as well.

I like to cut the length of the paper first, on both sizes. This makes for less cutting at the end.

Once all your bookmarks are cut into rectangles, you can use a corner cutter to round the edges. This gives the bookmarks a more professional look and stops them from poking and cutting.

Add a tassel – optional
If you like to have tassels on your bookmarks, this is a simple addition. All you need to do is punch a hole in the bookmark.
You can either buy tassels (there are cute ones) or make your own. I have created a video on how to make tassels, which you can watch here.
I didn’t add tassels to these bookmarks because I like the way they look without them, but everyone has their own preferences.
Once you have your tassels ready, look them through the hole and you are ready to use your bookmark!
And there you have it! Your holographic bookmarks are complete

Things I learned while making holographic bookmarks
As I’m writing what I learned making these bookmarks, I always laugh, as I think they are more of a warning and should probably be written at the top. But I hope the full details of the project are read before we attempt to make them so we can not make the same mistakes. So, in that vane, here is what I learned:
- If you are using regular printer paper, your bookmark may be less vibrant and not be very thick. There is no problem with this, this is how I make mine. If you use thicker paper, such as 60lbs cardstock, your bookmark will be thicker and depending on the quality of the cardstock your color may be more vibrant.
- I like to have both sizes of the bookmark holographic. The nice thing about adding holographic paper to the back is that it will increase the thickness of the bookmark and make it more durable.
- When applying the holographic sticker paper to the printed bookmarks you should know that the holographic paper can scratch easily. So, if using a rough edge to push the holographic paper down, it can scratch it up. Using a soft fabric cover over your ruler or burnishing tool can help keep the scratches to a minimum.
- Not all holographic paper designs are the same. In this project, I used 4 different holographic sticker designs. I found that plain holographic and the stars design worked best. The confetti was far too busy and took away from the image on the bookmark.
Don’t forget, if you want to use my FREE designs, you can get them below by signing up for my newsletter.
Did you enjoy making these holographic bookmarks?
Did you enjoy making these holographic bookmarks? Let me know in the comments below! If you made them and have any suggestions on how to make them better let me know! Also, if you tried this craft, tell me how it turned out!
If you enjoyed this craft, check out my other paper crafts here.
Also, you can check out my sticker crafts here. They are great for using up some of that holographic sticker paper!